 So you’ve decided to build a custom pool — congratulations. A backyard pool in the Coachella Valley is one of the most rewarding home improvements you can make. But if you’ve never been through the process before, it can feel like a mystery. What happens first? How long will it take? When do you get to make design choices? What does the yard look like during construction? This guide walks you through every phase of the custom pool design and construction process — from your first conversation with a pool builder to the moment you take that first swim. Knowing what to expect at each step helps you make better decisions, stay calm during the messy middle phases, and end up with a pool that’s exactly what you envisioned. Here’s a complete look at how JB Pools guides Coachella Valley homeowners through the custom pool design and build process. 📅 Typical Timeline: From initial consultation to your first swim, a custom gunite pool in the Coachella Valley generally takes 10–16 weeks, depending on design complexity, permit processing times, and seasonal demand. Starting your planning 4–6 months before your target completion date is strongly recommended.
Step 1: Initial Consultation — Vision, Site, and Budget
Every custom pool project at JB Pools begins with a face-to-face consultation at your property. This isn’t a sales pitch — it’s a discovery conversation. The goal is to understand how you and your family plan to use the pool, what aesthetic you’re drawn to, and what your realistic budget looks like. During the initial consultation, your builder will:- Walk the property to assess yard dimensions, grade changes, access points, and any obstacles (utilities, trees, setback requirements)
- Discuss how you’ll use the pool — lap swimming, family recreation, entertaining, therapy, or a combination
- Review your style preferences — freeform vs. geometric, modern vs. tropical, minimalist vs. feature-rich
- Discuss add-ons you’re interested in: spa, baja shelf, water features, fire elements, outdoor kitchen integration
- Establish a realistic budget range so the design can be tailored accordingly
- Review HOA guidelines if applicable — many Coachella Valley communities have specific rules around pool size, fencing, and equipment placement
Step 2: Design Development — Drawings, 3D Renderings & Selections
After the consultation, your builder’s design team gets to work creating a custom plan for your pool. This is where the project starts to become real. Modern pool design uses 3D rendering software to give homeowners a visual preview of exactly what the finished pool will look like in their actual backyard. The design development phase includes:- A scaled site plan showing pool placement, setbacks, equipment location, and decking layout
- 3D renderings that show realistic finishes, water color, tile choices, and surrounding hardscape
- Material and finish selections: plaster or pebble interior, coping stone, tile band, and deck surface
- Equipment recommendations based on pool size, usage, and desert climate efficiency goals
- Lighting design — LED underwater fixtures, perimeter lighting, and accent lighting for features
- Optional feature layouts: waterfall walls, grottos, fire bowls, baja shelves, tanning ledges, and bubblers
Step 3: Proposal, Contract & Project Agreement
Once the design is finalized and you’re happy with the plan, your builder will present a detailed written proposal. This document is the foundation of your project agreement and should leave no room for ambiguity. A thorough proposal from JB Pools includes:- Full itemized scope of work — pool shell, decking, plumbing, electrical, equipment, features, and finishes
- Specific brand and model of all equipment included
- Material specifications with finish grades clearly identified
- Payment schedule tied to construction milestones — not arbitrary calendar dates
- Estimated project timeline from permit submission through final walkthrough
- Warranty terms for workmanship and equipment
- Change order policy — how design modifications mid-project are handled and priced
Step 4: Permitting — Working Through Riverside County
Permitting is often the phase that surprises first-time pool owners the most. It’s not glamorous, but it’s non-negotiable. All pool construction in the Coachella Valley requires permits from Riverside County (or the applicable city jurisdiction), and the process involves submitting detailed engineering drawings, obtaining plan approval, and scheduling inspections at multiple stages of construction. Typical permit requirements include:- Structural engineering plans for the pool shell, especially for gunite construction
- Electrical plans showing bonding, lighting, and equipment wiring
- Plumbing diagrams for circulation, drainage, and water supply
- Fence and barrier compliance documentation (California requires compliant safety barriers around all residential pools)
- Site plan showing pool placement relative to property lines and structures
Step 5: Site Preparation & Excavation
Once permits are in hand, the physical work begins. Excavation is one of the most dramatic phases of the project — in a single day, your backyard is transformed as heavy equipment digs out the pool shell. It’s exciting, but it’s also the point where the yard looks its least like a finished product. What happens during site preparation and excavation:- Underground utility lines are marked and avoided — call 811 before any digging
- Equipment access routes are determined and protected to minimize yard damage
- The pool footprint is staked out per the approved plans
- Excavation is performed to the precise depth required by the structural design
- Soil is hauled off-site — Coachella Valley’s sandy, expansive soils require careful disposal
- A first county inspection is scheduled to verify excavation dimensions before steel begins
Step 6: Steel Reinforcement & Plumbing Rough-In
After excavation passes inspection, the steel crew moves in. A gunite pool — the most common construction method used in the Coachella Valley — is reinforced with a precisely engineered grid of rebar that forms the structural skeleton of the pool shell. What happens during this phase:- Rebar is bent, cut, and tied into a complete three-dimensional cage following the structural engineering plans
- All plumbing lines are run — main drains, return jets, skimmer connections, and any water feature supply lines
- Conduit for lighting and automation wiring is installed
- Niches for lights and in-floor cleaning systems (if specified) are positioned
- A second county inspection is conducted to verify steel and plumbing before gunite is applied
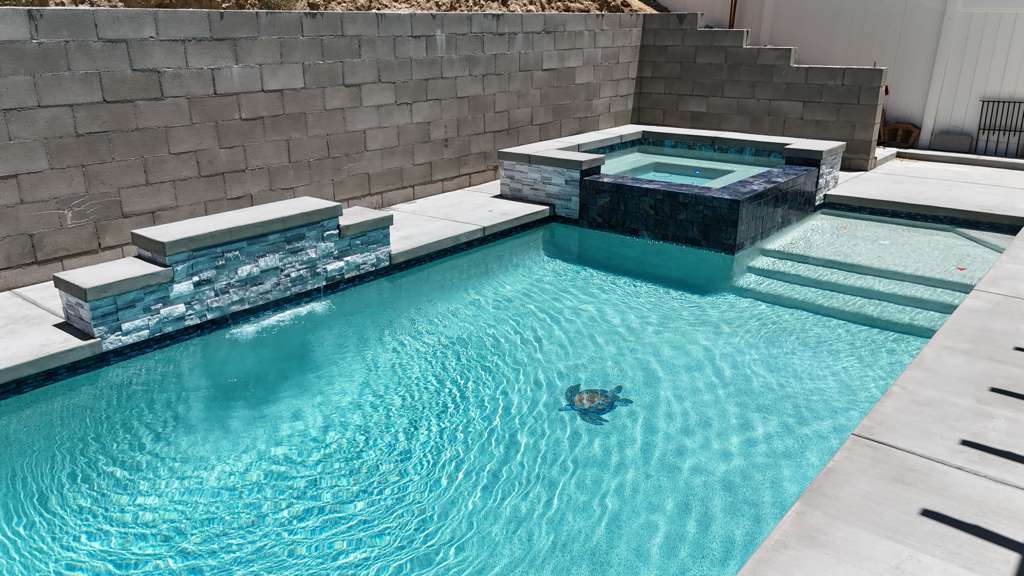
Step 7: Gunite Application — Forming the Pool Shell
Gunite day is one of the most satisfying milestones of the entire build. A specialized crew uses high-pressure equipment to pneumatically apply a dry concrete mix — gunite — over the rebar framework. Within a few hours, the walls and floor of your custom pool take permanent shape. Why gunite is the preferred method in the Coachella Valley:- Extremely durable and long-lasting — properly built gunite pools routinely last 30–50+ years
- Fully customizable shape — unlike fiberglass shells, gunite can be built to any dimension, depth, or curve
- Performs well in extreme heat — the thermal mass of the concrete shell resists cracking under desert temperature swings
- Supports heavy water features, raised spas, and complex design integrations
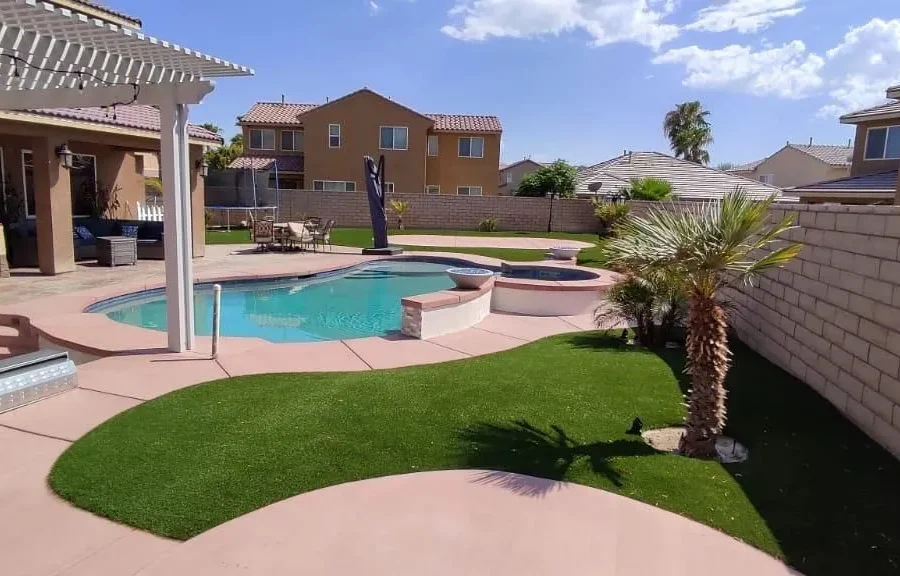
Step 8: Decking, Coping & Exterior Work
While the gunite shell cures, exterior work can proceed simultaneously — keeping the project moving efficiently. The deck and coping selections you made during the design phase are now installed, and the pool area begins to look like a finished outdoor living space. Exterior work completed during this phase:- Coping installation — the cap stones or pavers that frame the pool edge and serve as both a design element and a functional grip surface
- Pool deck poured or installed — concrete, cool deck, travertine, flagstone, or pavers depending on your selections
- Equipment pad construction — the concrete pad where your pump, filter, heater, and automation system will be mounted
- Gas line rough-in for heater (if specified)
- Water feature and fire feature structural work completed and prepared for finish
Step 9: Equipment Installation & Electrical
With the shell cured and the deck in place, your pool equipment is installed and wired. This includes everything that keeps your pool clean, comfortable, and enjoyable year-round — and in the Coachella Valley, choosing the right equipment matters more than almost anywhere else in California. Standard equipment installed at this phase:- Variable speed pump — now required by California code, and dramatically more energy-efficient than single-speed pumps
- Filtration system — cartridge or sand filter sized appropriately for pool volume
- Heater or heat pump — natural gas heaters heat pools fastest; heat pumps are more energy-efficient for frequent use
- Sanitization system — saltwater chlorine generator, traditional chlorinator, or UV/ozone hybrid
- Automation controller — allows scheduling and remote control of all equipment via smartphone
- LED lighting — energy-efficient, long-lasting, and available in full-color options
- Autofill valve — automatically maintains water level to compensate for the Coachella Valley’s high evaporation rate
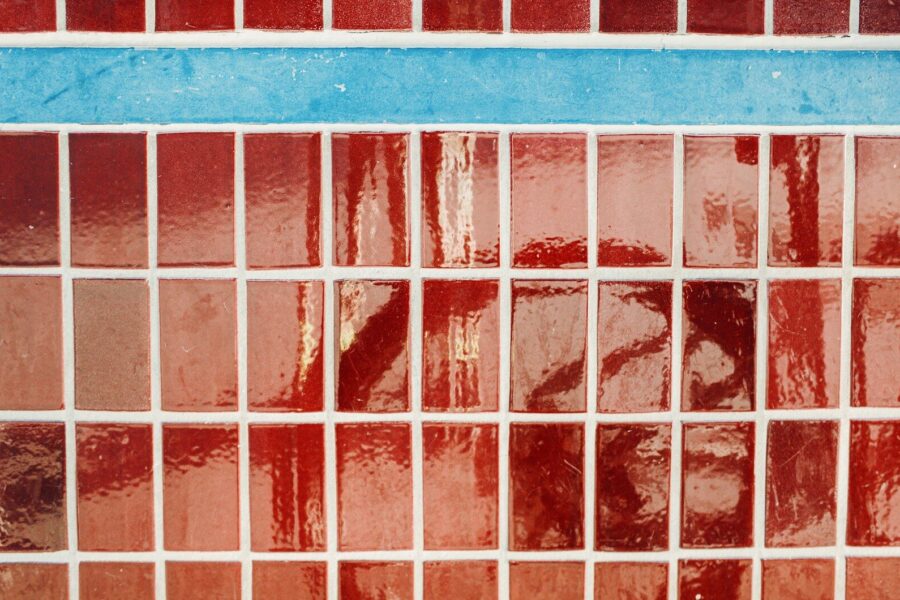
Step 10: Interior Finish — Plaster, Pebble or Tile
The interior finish is the final visual element of the pool shell — and one of the most impactful design choices you’ll make. It determines the color of your water, the texture underfoot, and how the pool looks from every angle of your yard. Common interior finish options:- White plaster — the most affordable option; produces a bright blue water appearance. Typically lasts 7–12 years before resurfacing in desert climates
- Colored plaster — available in grey, blue, and other tones; same durability as white plaster but with more design control
- Pebble finish (Pebble Tec, Pebble Sheen, StoneScapes) — a premium aggregate finish mixed with river pebbles or glass beads; lasts 15–25+ years, highly durable in the desert, and creates stunning water colors
- Glass tile — the most luxurious option; applied as an accent band or full interior; reflects light beautifully and is extremely durable
Step 11: Final Inspections & Safety Compliance
Before you’re cleared to swim, the project undergoes final county inspections. This includes a review of all electrical bonding and grounding, equipment installation, plumbing connections, and safety barrier compliance. California law requires that every residential pool has at least one of the following seven drowning prevention safety features:- An enclosure isolating the pool from the house
- Removable mesh fencing with a self-closing, self-latching gate
- An approved pool cover
- Exit alarms on all doors that access the pool area
- A self-closing, self-latching gate at the pool barrier
- An approved surface alarm
- A subsurface alarm
Step 12: Owner Orientation & First Swim
The final step before you’re on your own is the owner orientation — a walkthrough of your new pool and all its systems. This is one of the most important meetings of the entire project. Take notes, ask questions, and if possible, have the person who will be responsible for pool maintenance present. Your orientation will cover:- How to operate your automation system and schedule pump cycles
- How to test and adjust water chemistry for desert conditions
- Proper cleaning procedures for your specific interior finish
- How to winterize or prepare the pool for seasonal changes (minimal in the desert, but relevant for equipment)
- Warranty information for all equipment and workmanship
- Who to call for service, warranty issues, and ongoing maintenance
Quick-Reference: Custom Pool Build Timeline
Here’s a simplified view of the typical custom pool construction timeline in the Coachella Valley:| Phase | Typical Duration | Key Milestone |
|---|---|---|
| Consultation & Design | 1–2 weeks | Design approved & signed |
| Contract & Deposit | 1–2 days | Project officially begins |
| Permitting | 2–6 weeks | Permit issued by county |
| Excavation | 1–2 days | Pool shape takes form |
| Steel & Plumbing | 3–5 days | Pre-gunite inspection passed |
| Gunite Application | 1 day + 28-day cure | Shell is permanent |
| Decking & Coping | 1–2 weeks | Yard begins to look finished |
| Equipment & Electrical | 3–5 days | All systems installed |
| Interior Finish | 1–2 days | Pool immediately filled |
| Start-Up & Chemistry | 2 weeks | Water balanced & clear |
| Final Inspections | 1–3 days | Permit closed |
| Owner Orientation | 2–3 hours | First swim! |
Building Your Custom Pool with JB Pools
At JB Pools, we’ve guided countless Coachella Valley homeowners through every one of these steps. We know that building a pool is a major investment — not just financially, but emotionally. You’re trusting us with your home, your backyard, and your vision. What our clients can expect throughout the process:- Transparent communication at every phase — you’ll never be left wondering what’s happening or what comes next
- A dedicated project manager who is your single point of contact from start to finish
- Desert-specific expertise built into every design and material selection
- Fully permitted, inspected construction — no shortcuts, no workarounds
- A beautiful finished product that performs as well as it looks, year after year
JB Pools Inc. is a licensed pool contractor serving the Coachella Valley since 2004. Family-owned and operated from Palm Desert, CA. (760) 393-1326